Raspberry PI + g-SPS 5V [LiPOL]. Power your Raspberry PI from any +6-20V power supplies
This part implements the same principles as presented in RASPBERRY PI FREE STYLE POWERING post, but without wires.
Modules, parts used
a. Raspberry PI 3 / 2 / ZERO / B+ board or other RPI like board
b. g-SPS 5V [LiPOL] version switching power supply, equipped as in page 2 (the 10 x 2.54mm socket it is not mandatory)
b. Any external power supply (wall power adapter, LEAD-GEL battery or 2/3/4 cells LiPOL battery, other..) providing +6 => +20V and > 1A.
c. i-HAT3GGSM adapter prepared as shown in page 2.
WARNING: THE STANDARD RPI POWER SUPPLY MUST NOT BE CONNECTED TO THE RPI POWERING USB!!!
i-HAT3GGSM solder jumpers configuration recap
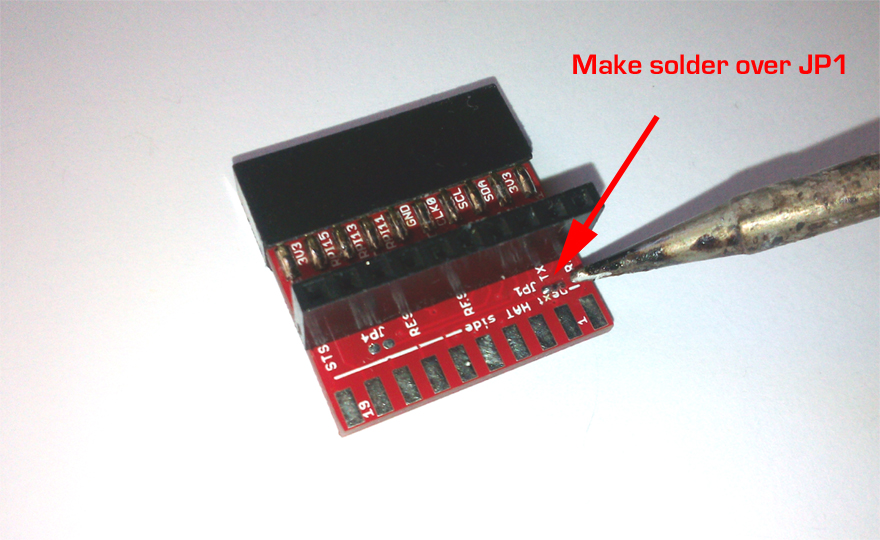
- JP1 - CIRCUIT OPEN (not connected) default ==> CIRCUIT CLOSED (connected) REQUIERED
- JP2 - CIRCUIT CLOSED (connected) default
- JP3 - CIRCUIT CLOSED (connected) default
- JP4 - CIRCUIT OPEN (not connected) default

IMPORTANT, DO NOT FORGET: make short/solder over JP1 (connect 5V from RPi with Vout on the g-SPS board), as in up-here picture.
Put all parts and modules together
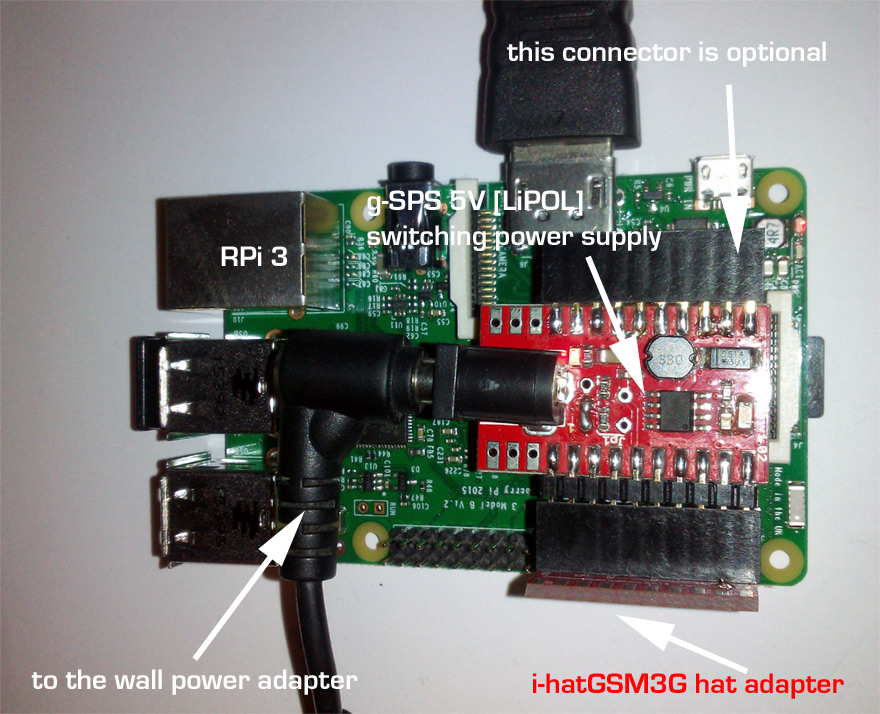
![Raspberry PI + g-SPS 5V [LiPOL], power the Raspberry PI from +6-20V power supplies - click to enlarge Raspberry PI + g-SPS 5V [LiPOL], power the Raspberry PI from +6-20V power supplies](../images/i-hatGSM3G-g-SPS-assy2_880px.jpg)

a. Double check boards for soldering short-circuits.
b. Notice in picture the side/position on RPI extension connector. Same for g-SPS 5V [LiPOL] switching power supply connector.
c. Insert boards connectors gentely (plug the bords together).
d. Connect keyboard, mouse, DVI, ethernet..
e. Plug the power cable into g-SPS board Vin connector.
DONE!
WARNING:
THIS POWERING CONFIGURATION BYPASS THE RPI BUILT IN 5V POWERING SECTION!
TUTORIAL PROVIDED WITHOUT ANY WARRANTY!!! USE IT AT YOUR OWN RISK!!!!
Go to the next page to see other configuration.
TO BE CONTINUED... Come back soon.