About this tutorial
Our l-LTE v1.07 4G/LTE CAT 1 shield and l-LTE v 1.07 4G/LTE CAT 4 shield, the smallest 4G/LTE shields available today, have one high performances GNSS [GPS+GLONASS] engine embedded. By default, the GNSS antenna circuitry is configured for pasive GNSS antennas [does not have enabled the GNSS antenna power supply circuitry]. Even the performances achieved with passive GNSS [GPS+GLONASS] antennas are quite impressive, for some projects the usage of active GNSS antenna it's a must.
Bellow, you can find how to enable the active GNSS antenna powering circuitry for l-LTE shields.
Platforms: ARDUINO, BEAGLEBONE, TEENSY, RASPBERRY PI or other 2.8V-5V micro-controller or SBC.
Time needed: maximum 10 minutes.
Previous skills required: Soldering.
l-LTE shield reference

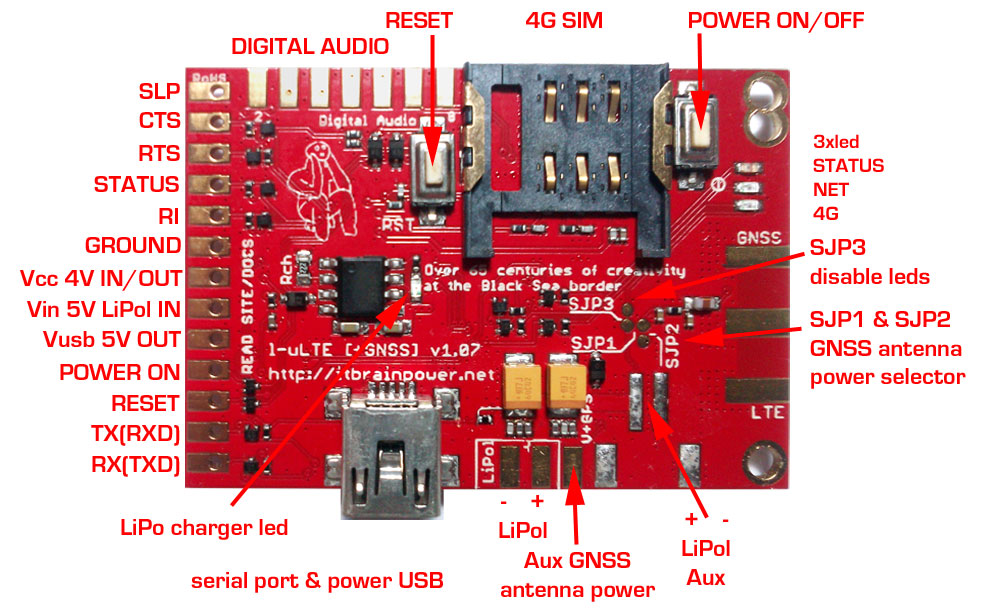
In the image up-here, notice:
a. the "SJP1 and SJP2 - GNSS antenna power selector" solder jumpers. By default, both SJP1 and SJP2 are in "CIRCUIT OPEN" configuration [no connection between solder jumpers pads].
b. the "Aux GNSS antenna power" pad [marked "v+GPS" on the board]- variant for the GNSS antenna power source.
GNSS active antenna use cases
Scenario A: your GNSS active antenna supports powering voltages provided by the Vbat circuit [provided by LiPO battery / charger, 3.10->4.25V]; Eg.: your antenna supports 3-5V powering [most of the antennas supports this]. The GNSS antenna will be powered all time.
Scenario B: your GNSS active antenna does not support voltages between 3.10->4.25V [Eg.: your GNSS antenna supports 5V only powering], or you want to implement a sort of power management for the GNSS antenna powering circuitry.
GNSS active antenna powering implementation
Scenario A: just make a solder over SJP1 [this will connect Vbat to GNSS antenna circuitry]. Leave SJP2 not soldered [CIRCUIT OPEN]. Done.
Scenario B: make a solder over SJP2 [this will connect Vbat to GNSS antenna circuitry]. Leave SJP1 not soldered [CIRCUIT OPEN]. Power the GNSS antenna via "v+GPS" pad and one "GND" pad [the one placed in the right side of the "v+GPS" pad] using proper voltage low noise power source. Done.
HINTS:
1. Always double check what you've done, before powering.
2. You may use GPS only antenna, but the GLONASS satellites will be seen with not so good/proper signal/noise ratio [the GLONASS bandwidth is different from GPS one]. In 99% of the cases this crack will work for you. Anyway, we recommend combo GPS+GLONASS antenna usage.
TUTORIAL PROVIDED WITHOUT ANY WARRANTY!!! USE IT AT YOUR OWN RISK!!!!