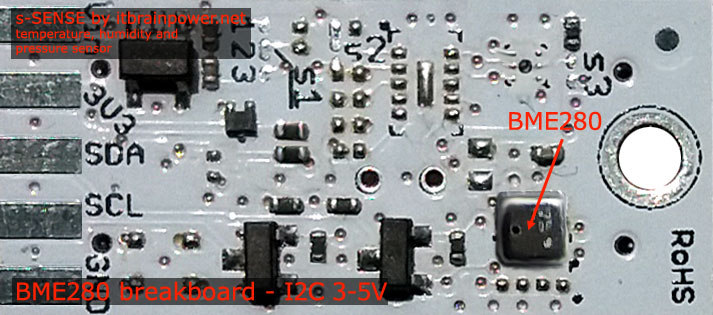
About BME280 - temperature, humidity and pressure sensor
Bosch BME280 it's a digital humidity, pressure and temperature sensor. Main measurement characteristics:
- ambient range for operation -40 ~ +85C, 0%-100% r.H., 300-1100hPa
- humidity accuracy +-3%
- absolute temperature (0-65C) accuracy +-1C
- absolute/relative pressure accuracy +-0.6hPa/+-0.12hPa
More info on: BME280 datasheet
In June 2019 we've realeased 6 new environmental and air quality sensors, including Bosch Sensortec BME280, all being part of the s-Sense I2C sensor breakout family.
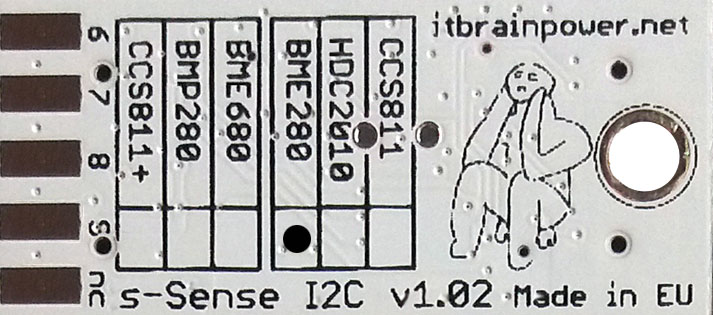
HINT: Do not be confused! BMP280 sensor (temperature+pressure - no humidity!) and BMP280 sensor (temperature+pressure+humidity) seems to be similar, but: the first one is a little bit smaller and on s-Sense PCB bottom you will find the sensor type marking.
s-Sense BME280 sensor breakout by itbrainpower.net


PN: SS-BME280#I2C SKU: ITBP-6002 BME280 I2C sensor breakout info
Next, let's kickstart with BME280 sensor I2C breakout - around 10-15 minutes.
Arduino BME280 sensor hardware integration (wiring)
First, identify if your Arduino it's 5V or 3.3V compliant!
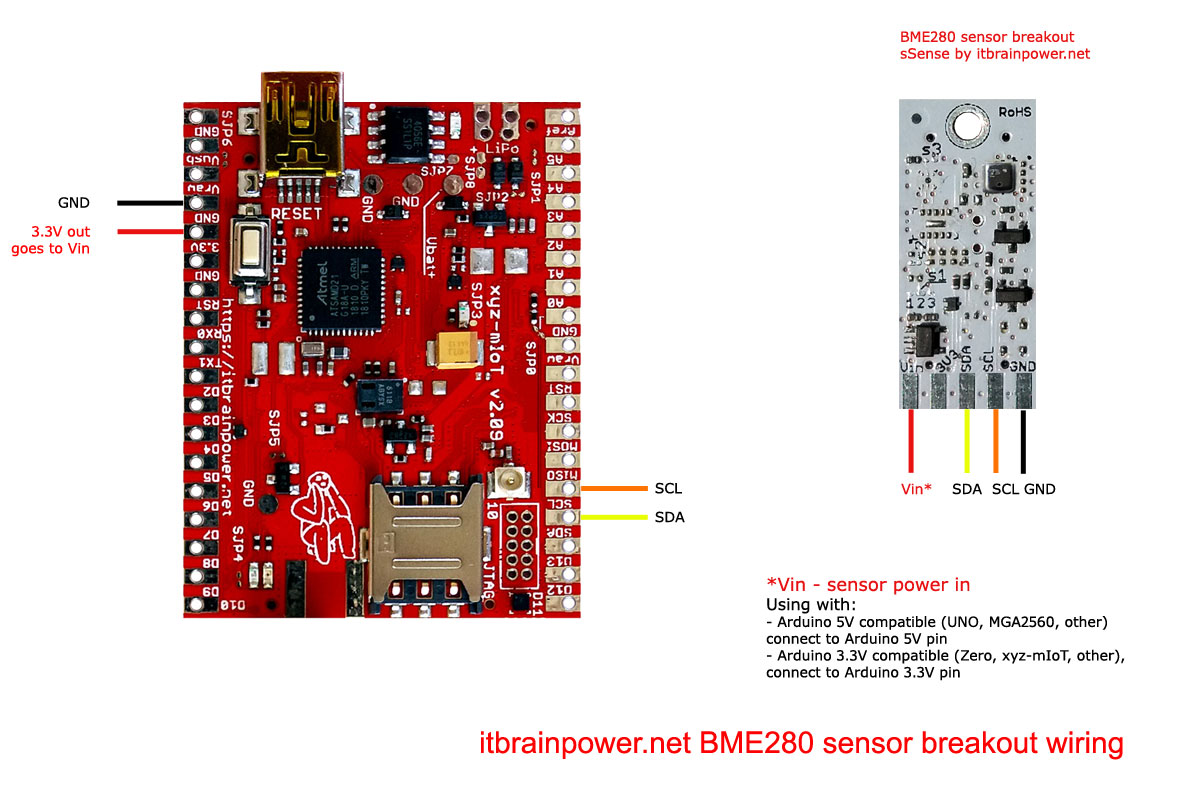
The BME280 I2C sensor breakout it's shipped in default auto 3-5V compliant configuration. In a nut shell, wire as bellow:
| BME280 breakout | Arduino 5V [Eg.: UNO] | Arduino 3.3V [Eg.: Zero] |
|---|---|---|
| Vin PAD | 5V | 3.3V |
| Vdd PAD (3V3) | do not connect | do not connect |
| SDA PAD | SDA | SDA |
| SCL PAD | SCL | SCL |
| GND PAD | GND | GND |
HINT, for some ARDUINO boards:
* SDA (Serial Data) --> A4 on Uno/Pro-Mini, 20 on Mega2560/Due, 2 Leonardo/Pro-Micro
* SCK (Serial Clock) --> A5 on Uno/Pro-Mini, 21 on Mega2560/Due, 3 Leonardo/Pro-Micro
Bellow, sensor wiring example with xyz-mIoT shield [AT SAMD21G, 3.3V compliant, with or without modems]:

Arduino BME280 sensor software
a. download BME280/BMP280 Arduino library from: here.
b. unzip the library and install in Arduino libraries folder. Restart Arduino.
c. Make a folder named "ssense_BMx280_example".
Copy the code bellow, paste it one new file and save the file as "ssense_BMx280_example.ino" in the folder created in previously or, you may
download it from here (right click & save as): BME280 / BMP280 - read sensor data Arduino code
| 1 | /* s-Sense BME280 I2C / s-Sense BMP280 I2C sensor breakout example - v1.0/20190524. |
| 2 | * |
| 3 | * Compatible with: |
| 4 | * s-Sense BME280 I2C sensor breakout - temperature, humidity and pressure - [PN: SS-BME280#I2C, SKU: ITBP-6002], info https://itbrainpower.net/sensors/BME280-TEMPERATURE-HUMIDITY-PRESSURE-I2C-sensor-breakout |
| 5 | * s-Sense BMP280 I2C sensor breakout - temperature and pressure - [PN: SS-BMP280#I2C, SKU: ITBP-6001], info https://itbrainpower.net/sensors/BMP280-TEMPERATURE-HUMIDITY-I2C-sensor-breakout |
| 6 | * |
| 7 | * This code shows how to use predefined recommended settings from Bosch for the BME280/BMP280 environmental sensor. Read temperature, |
| 8 | * humidity (unavailable for BMP280) and pressure (pulling at 1sec) - code based on BME280-2.3.0 library originally written by Tyler Glenn |
| 9 | * and forked by Alex Shavlovsky. Some part of code was written by Brian McNoldy. |
| 10 | * Amazing work folks! |
| 11 | * |
| 12 | * We've just select the relevant functions, add some variables, functions and fuctionalities. |
| 13 | * |
| 14 | * |
| 15 | * Mandatory wiring: |
| 16 | * Common for 3.3V and 5V Arduino boards: |
| 17 | * sensor I2C SDA <------> Arduino I2C SDA |
| 18 | * sensor I2C SCL <------> Arduino I2C SCL |
| 19 | * sensor GND <------> Arduino GND |
| 20 | * For Arduino 3.3V compatible: |
| 21 | * sensor Vin <------> Arduino 3.3V |
| 22 | * For Arduino 5V compatible: |
| 23 | * sensor Vin <------> Arduino 5V |
| 24 | * |
| 25 | * Leave other sensor PADS not connected. |
| 26 | * |
| 27 | * SPECIAL note for some ARDUINO boards: |
| 28 | * SDA (Serial Data) -> A4 on Uno/Pro-Mini, 20 on Mega2560/Due, 2 Leonardo/Pro-Micro |
| 29 | * SCK (Serial Clock) -> A5 on Uno/Pro-Mini, 21 on Mega2560/Due, 3 Leonardo/Pro-Micro |
| 30 | * |
| 31 | * WIRING WARNING: wrong wiring may damage your Arduino board MCU or your sensor! Double check what you've done. |
| 32 | * |
| 33 | * READ BME280 documentation! https://itbrainpower.net/sensors/BME280-TEMPERATURE-HUMIDITY-PRESSURE-I2C-sensor-breakout |
| 34 | * READ BMP280 documentation! https://itbrainpower.net/sensors/BMP280-TEMPERATURE-PRESSURE-I2C-sensor-breakout |
| 35 | * |
| 36 | * We ask you to use this SOFTWARE only in conjunction with s-Sense BME280 I2C or s-Sense BMP280 I2C sensor breakout usage. Modifications, derivates |
| 37 | * and redistribution of this SOFTWARE must include unmodified this notice. You can redistribute this SOFTWARE and/or modify it under the |
| 38 | * terms of this notice. |
| 39 | * |
| 40 | * This SOFTWARE is distributed is provide "AS IS" in the hope that it will be useful, but WITHOUT ANY WARRANTY; without even the implied warranty of |
| 41 | * MERCHANTABILITY or FITNESS FOR A PARTICULAR PURPOSE. |
| 42 | * |
| 43 | * itbrainpower.net invests significant time and resources providing those how to and in design phase of our IoT products. |
| 44 | * Support us by purchasing our environmental and air quality sensors from https://itbrainpower.net/order#s-Sense |
| 45 | * |
| 46 | * |
| 47 | * Dragos Iosub, Bucharest 2019. |
| 48 | * https://itbrainpower.net |
| 49 | */ |
| 50 | |
| 51 | #define SERIAL_SPEED 19200 |
| 52 | |
| 53 | #include <sSense-BMx280I2C.h> |
| 54 | #include <Wire.h> |
| 55 | |
| 56 | |
| 57 | /* Recommended Modes - |
| 58 | Based on Bosch BME280I2C environmental sensor data sheet. |
| 59 | |
| 60 | Weather Monitoring : |
| 61 | forced mode, 1 sample/minute |
| 62 | pressure ×1, temperature ×1, humidity ×1, filter off |
| 63 | Current Consumption = 0.16 μA |
| 64 | RMS Noise = 3.3 Pa/30 cm, 0.07 %RH |
| 65 | Data Output Rate 1/60 Hz |
| 66 | |
| 67 | Humidity Sensing : |
| 68 | forced mode, 1 sample/second |
| 69 | pressure ×0, temperature ×1, humidity ×1, filter off |
| 70 | Current Consumption = 2.9 μA |
| 71 | RMS Noise = 0.07 %RH |
| 72 | Data Output Rate = 1 Hz |
| 73 | |
| 74 | Indoor Navigation : |
| 75 | normal mode, standby time = 0.5ms |
| 76 | pressure ×16, temperature ×2, humidity ×1, filter = x16 |
| 77 | Current Consumption = 633 μA |
| 78 | RMS Noise = 0.2 Pa/1.7 cm |
| 79 | Data Output Rate = 25Hz |
| 80 | Filter Bandwidth = 0.53 Hz |
| 81 | Response Time (75%) = 0.9 s |
| 82 | |
| 83 | |
| 84 | Gaming : |
| 85 | normal mode, standby time = 0.5ms |
| 86 | pressure ×4, temperature ×1, humidity ×0, filter = x16 |
| 87 | Current Consumption = 581 μA |
| 88 | RMS Noise = 0.3 Pa/2.5 cm |
| 89 | Data Output Rate = 83 Hz |
| 90 | Filter Bandwidth = 1.75 Hz |
| 91 | Response Time (75%) = 0.3 s |
| 92 | |
| 93 | */ |
| 94 | |
| 95 | BMx280I2C::Settings settings( |
| 96 | BME280::OSR_X1, |
| 97 | BME280::OSR_X1, |
| 98 | BME280::OSR_X1, |
| 99 | BME280::Mode_Forced, |
| 100 | BME280::StandbyTime_1000ms, |
| 101 | BME280::Filter_Off, |
| 102 | BME280::SpiEnable_False, |
| 103 | 0x76 // I2C address. I2C specific. |
| 104 | ); |
| 105 | |
| 106 | BMx280I2C ssenseBMx280(settings); |
| 107 | |
| 108 | ////////////////////////////////////////////////////////////////// |
| 109 | void setup() |
| 110 | { |
| 111 | delay(5000); |
| 112 | DebugPort.begin(SERIAL_SPEED); |
| 113 | |
| 114 | while(!DebugPort) {} // Wait |
| 115 | |
| 116 | DebugPort.println("s-Sense BME/BMP280 I2C sensor."); |
| 117 | |
| 118 | Wire.begin(); |
| 119 | while(!ssenseBMx280.begin()) |
| 120 | { |
| 121 | DebugPort.println("Could not find BME/BMP280 sensor!"); |
| 122 | delay(1000); |
| 123 | } |
| 124 | |
| 125 | switch(ssenseBMx280.chipModel()) |
| 126 | { |
| 127 | case BME280::ChipModel_BME280: |
| 128 | DebugPort.println("Found BME280 sensor! Humidity available."); |
| 129 | break; |
| 130 | case BME280::ChipModel_BMP280: |
| 131 | DebugPort.println("Found BMP280 sensor! No Humidity available."); |
| 132 | break; |
| 133 | default: |
| 134 | DebugPort.println("Found UNKNOWN sensor! Error!"); |
| 135 | } |
| 136 | |
| 137 | // Change some settings before using. |
| 138 | settings.tempOSR = BME280::OSR_X4; |
| 139 | |
| 140 | ssenseBMx280.setSettings(settings); |
| 141 | } |
| 142 | |
| 143 | ////////////////////////////////////////////////////////////////// |
| 144 | void loop() |
| 145 | { |
| 146 | printBMx280Data(&DebugPort); |
| 147 | delay(500); |
| 148 | } |
| 149 | |
| 150 | ////////////////////////////////////////////////////////////////// |
| 151 | void printBMx280Data |
| 152 | ( |
| 153 | Stream* client |
| 154 | ) |
| 155 | { |
| 156 | float temp(NAN), hum(NAN), pres(NAN); |
| 157 | |
| 158 | BME280::TempUnit tempUnit(BME280::TempUnit_Celsius); |
| 159 | BME280::PresUnit presUnit(BME280::PresUnit_Pa); |
| 160 | |
| 161 | ssenseBMx280.read(pres, temp, hum, tempUnit, presUnit); |
| 162 | |
| 163 | client->print("Temp: "); |
| 164 | client->print(temp); |
| 165 | //client->print("°"+ String(tempUnit == BME280::TempUnit_Celsius ? 'C' :'F')); |
| 166 | client->print(" "+ String(tempUnit == BME280::TempUnit_Celsius ? 'C' :'F')); |
| 167 | client->print("\t\tHumidity: "); |
| 168 | client->print(hum); |
| 169 | client->print("% RH"); |
| 170 | client->print("\t\tPressure: "); |
| 171 | client->print(pres); |
| 172 | client->println(" Pa"); |
| 173 | |
| 174 | delay(1000); |
| 175 | } |
| 176 |
c'. The very same code it's available in Arduino "File-> Examples", under "ssense-BMx280" library.
d. Compile and upload the code to your Arduino shield. The sensor data may be seen on Arduino Serial Monitor (set to 19200bps).
What to do next:
- you may like to run the "ssense_BMx280_Environment_Calculations.ino" example - available in Arduino "File-> Examples", under "ssense-BMx280" library.
TUTORIAL PROVIDED WITHOUT ANY WARRANTY!!! USE IT AT YOUR OWN RISK!!!!