About this tutorial
Raspberry PI 3 brings new on the shelf functionalities like Bluetooth and wireless LAN, but comes with some issues related to the backwards compatibility. The integration of the new BCM2837 SOC- ARM Cortex-A53 CPU(ARM v8), 1.2GHz 64-bit quad-core- along side with the BCM43438 (combo 802.11n W-LAN and Bluetooth 4.1) chip generates two problems:
- a. /dev/ttyAMA0 serial port was moved from GPIO 14&15, in order to support the BTH conectivity and,
- b. Debian Wheezy (mainly used) distribution has not ARM v8 support ready. Raspbian Jessie distribution supported it and, at this time it, is the single Raspbian officially supported by raspberrypi.org.
This tutorial guide you how to deal with RASPBIAN JESSIE and Raspberry PI3 serial communication with 3G or GSM modem. Applies also to Raspberry PI2 / B+ / ZERO with Jessie distribution.
Time needed: between 30 minutes up to 120 minutes, if you start from scratch
Previous skills required: install/configure Linux/Raspbian, entry/medium level.
Hardware platform used for testing: Raspberry PI3, Raspberry PI2, c-uGSM, h-nanoGSM and d-u3G shields
c-uGSM / h-nanoGSM / d-u3G USB modem usage:
The USB functionality it is supported by Jessie out of the shelf.
You can check at the USB connection time:
- a.Run "tail -f /var/log/messages"
- b. Connect the USB cable (for d-u3G you must power the modem also)
Observe the following message:
"usb 1-1.2: cp210x converter now attached to ttyUSB0" for c-uGSM/h-nanoGSM (connection via /dev/ttyUSB0) or,
"cdc_acm 1-1.2:1.0: ttyACM0: USB ACM device" for d-u3G (connection via /dev/ttyACM0)
Hint: In RPi c-uGSM/h-nanoGSM via USB connection, RX and TX must be leaved un-connected.
CONFIGURE JESSIE for GSM/ 3G serial modem usage:
Whats the targets:
- a. Free and allocate it back to GPIO14/15 the /dev/ttyAMA0 serial port (make it available for GSM/3G modem usage)
- b. Allocate the /dev/ttyS0 mini UART(serial) port to the BLUETOOTH service (Raspberry PI 3 only) - OPTIONAL
Step 1: Download the Raspbian Jessy image from Raspberry Foundation downloads section.
Step 2: Install the Raspbian Jessy image to you SD card. See: how to install Raspian distribution images on SD card.
Step 3: Boot RPI with the OS image installed SD card
Step 4: Open a shell and run "sudo apt-get update"
Step 5: Run "sudo apt-get install mc" (optional)
Step 6: Run "sudo raspi-config" and:
- a. disable SERIAL console
- b. enable boot to runlevel3 / shell with or without password
- c. "enable SSHD" (optional)
Save/reboot if needed.
Step 7: Edit /boot/config.txt (Eg.: "sudo nano /boot/config.txt" or "sudo mcedit /boot/config.txt"), and add at the end of the file following two options:
- a. "dtoverlay=pi3-disable-bt" (disable BTH and remap ttyAMA0 back to GPIO 14&15)- b. "dtoverlay=pi3-miniuart-bt" (map miniuart to the Bluetooth chip) - OPTIONAL
Step 8: Run "sudo systemctl disable hciuart" (disable the BTH service)
Step 9: Edit /lib/systemd/system/hciuart.service (OPTIONAL), and:
- a. replace "/dev/ttyAMA0" with "/dev/ttyS0" (remap BTH to miniUART)- b. adjust the connection speed (the miniUART port supports up to 115200)
save.
Step 10: Run "sudo systemctl enable hciuart" (enable the BTH service) -OPTIONAL
Step 11: Reboot the RPi ("sudo init6" or "sudo shutdown -r"). DONE.
Raspbian Jessie, Raspberry PI 3 / 2 / ZERO and GSM / 3G serial modem usage additional hints
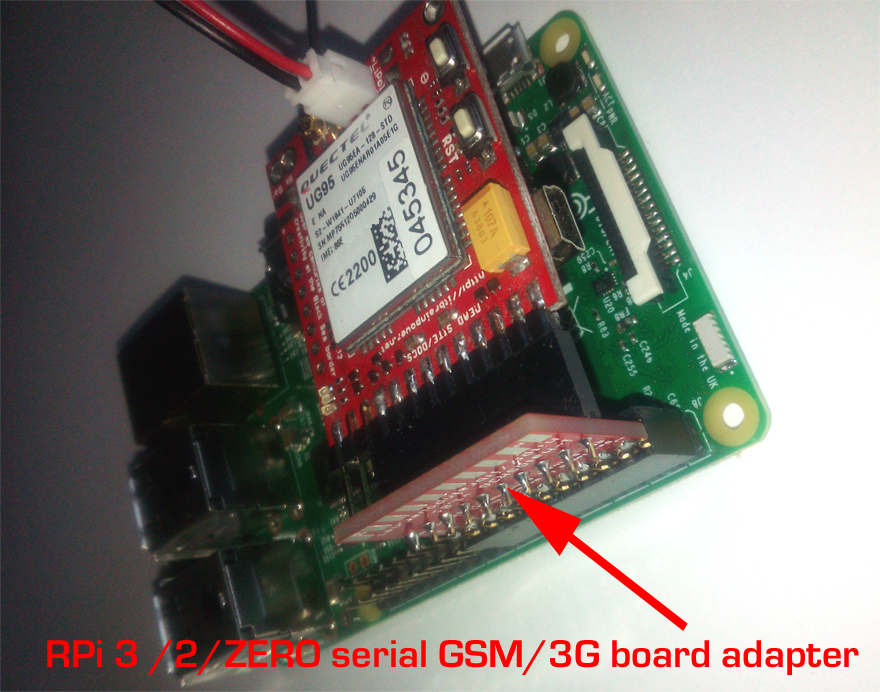
- a. For easiest hardware interfacing, we recomend to you our new i-hatGSM3G v1.01 by itbrainpower.net adapter board (connects your RPi x, B type to your c-uGSM/h-nanoGSM/d-u3G board without wires), as you see in bellow image.

- b. Download and use the latest version of c-uGSM demo/support files, d-u3G Python demo/support files or h-nanoGSM Python demo/support files.
For hardware reference (connect boards as in previous picture) read also c-uGSM, h-nsnoGSM and d-u3G shields and Raspberry PI howto using the new i-hatGSM3G RPi hat adapter.
TUTORIAL PROVIDED WITHOUT ANY WARRANTY!!! USE IT AT YOUR OWN RISK!!!!